
Is It Normal for an HVAC Condensate Line to Drip Directly Onto the Roof?
An air-conditioning system can produce water as it removes moisture from indoor air. The important question is not simply whether the pipe is dripping, but whether it is the intended drain, where the water is being discharged, and whether that discharge is keeping part of the roof and nearby exterior materials persistently wet.
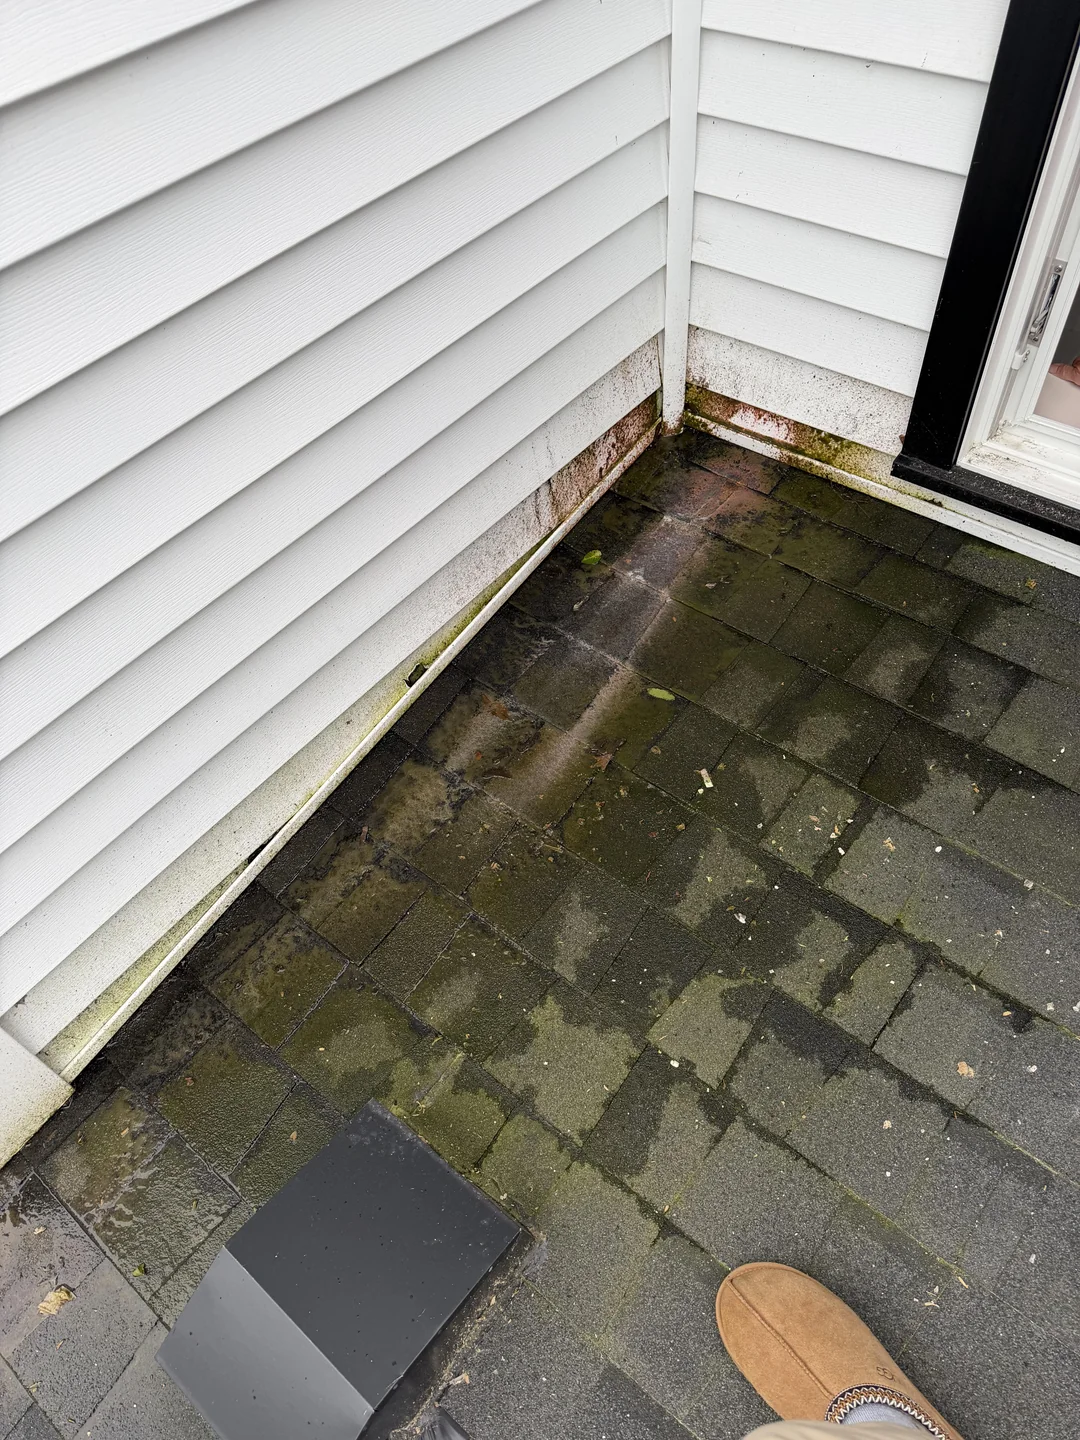
I am the first owner of a home built in 2025. I found what appears to be a condensation line dripping directly onto a lower section of the roof, and there is dark and green growth or staining along the wet area.
Is this normal, and is it a cause for concern? Should I have the line extended farther down the roof or redirected to the gutter?
What to Check First
Before changing the pipe, determine what it is intended to do. HVAC systems may have more than one condensate-related drain or overflow path, and the correct response depends on which line is discharging.
Ask Which Drain Line This Is
Send the photographs to the builder or installing HVAC contractor and ask them to identify the exterior pipe. Request confirmation of whether it is the normal drain, an auxiliary drain, or another line.
Document When It Drips
Note whether water appears only while the air conditioner is operating, continues after the system stops, or appears during other conditions such as rain.
Record the approximate flow as an occasional drip, steady dripping, or continuous stream.
Track the Wet Area From a Safe Location
Photograph the roof from the same safe location every few days. Document whether the wet-looking area dries between cooling cycles or remains damp most of the time.
Check Nearby Interior Areas
From inside the home, look for ceiling stains, damp drywall, musty odors, or moisture near the HVAC equipment. Do not enter an unsafe attic or walk on unfinished attic surfaces.
What the Photographs Show—and What They Do Not
A Pipe Terminating Above the Lower Roof
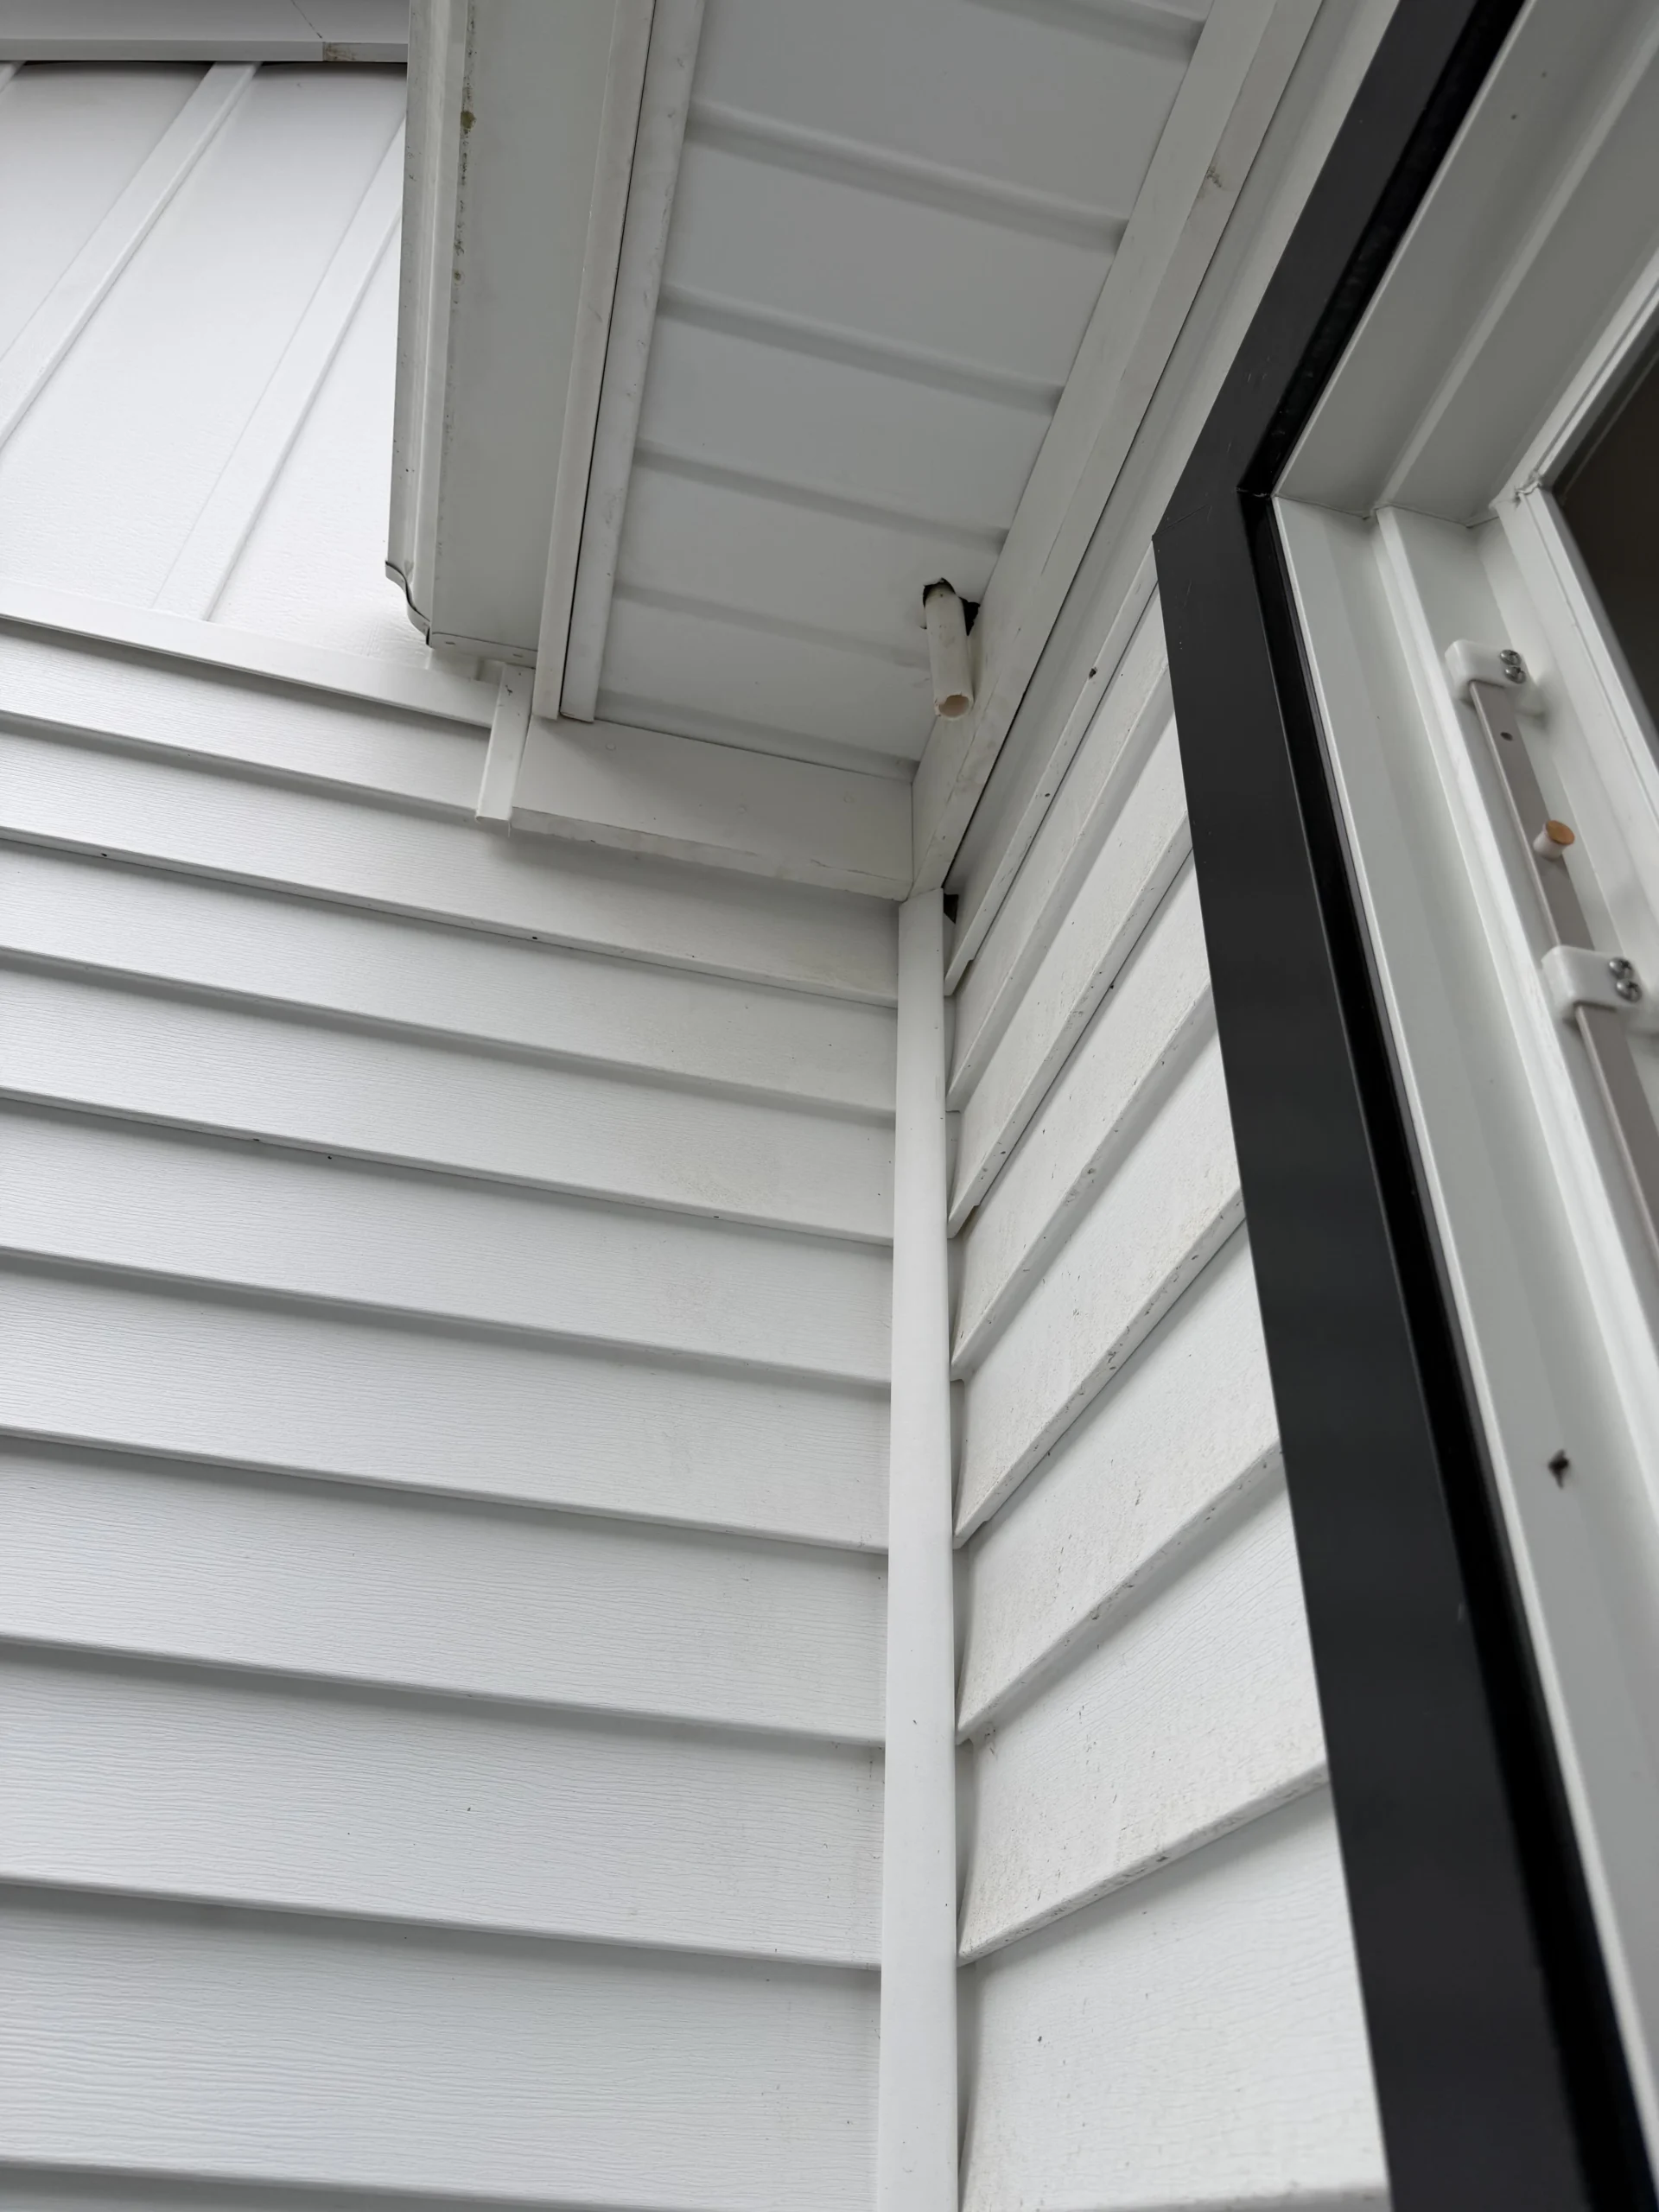
A short pipe is visible through the soffit area. Its position makes it plausible that discharged water could reach the roof below.
A Repeated Wet Path
The lower roof surface appears darker along a path extending away from the wall and pipe location.
Dark and Green Surface Discoloration
Discoloration is visible on portions of the shingles and near the base of the siding. A photograph cannot identify the material or determine whether it has affected the roofing beneath the surface.
The Source, Installation, and Roof Condition
The images do not establish which HVAC drain is discharging, whether the pipe is installed as designed, whether water is entering the roof assembly, or whether the shingles have been damaged.
Possible Explanations
The Pipe May Be the Normal Condensate Drain
The air-conditioning system may be removing moisture normally and sending that water through this line. The concern would then be whether the discharge location is appropriate and whether repeated wetting is affecting the roof or adjacent materials.
The Pipe May Be an Auxiliary or Overflow Drain
Some systems include a secondary route intended to carry water when the primary drain cannot do so normally. If this is an auxiliary line, active dripping may deserve prompt HVAC evaluation rather than simple redirection.
The Primary Drain May Be Restricted
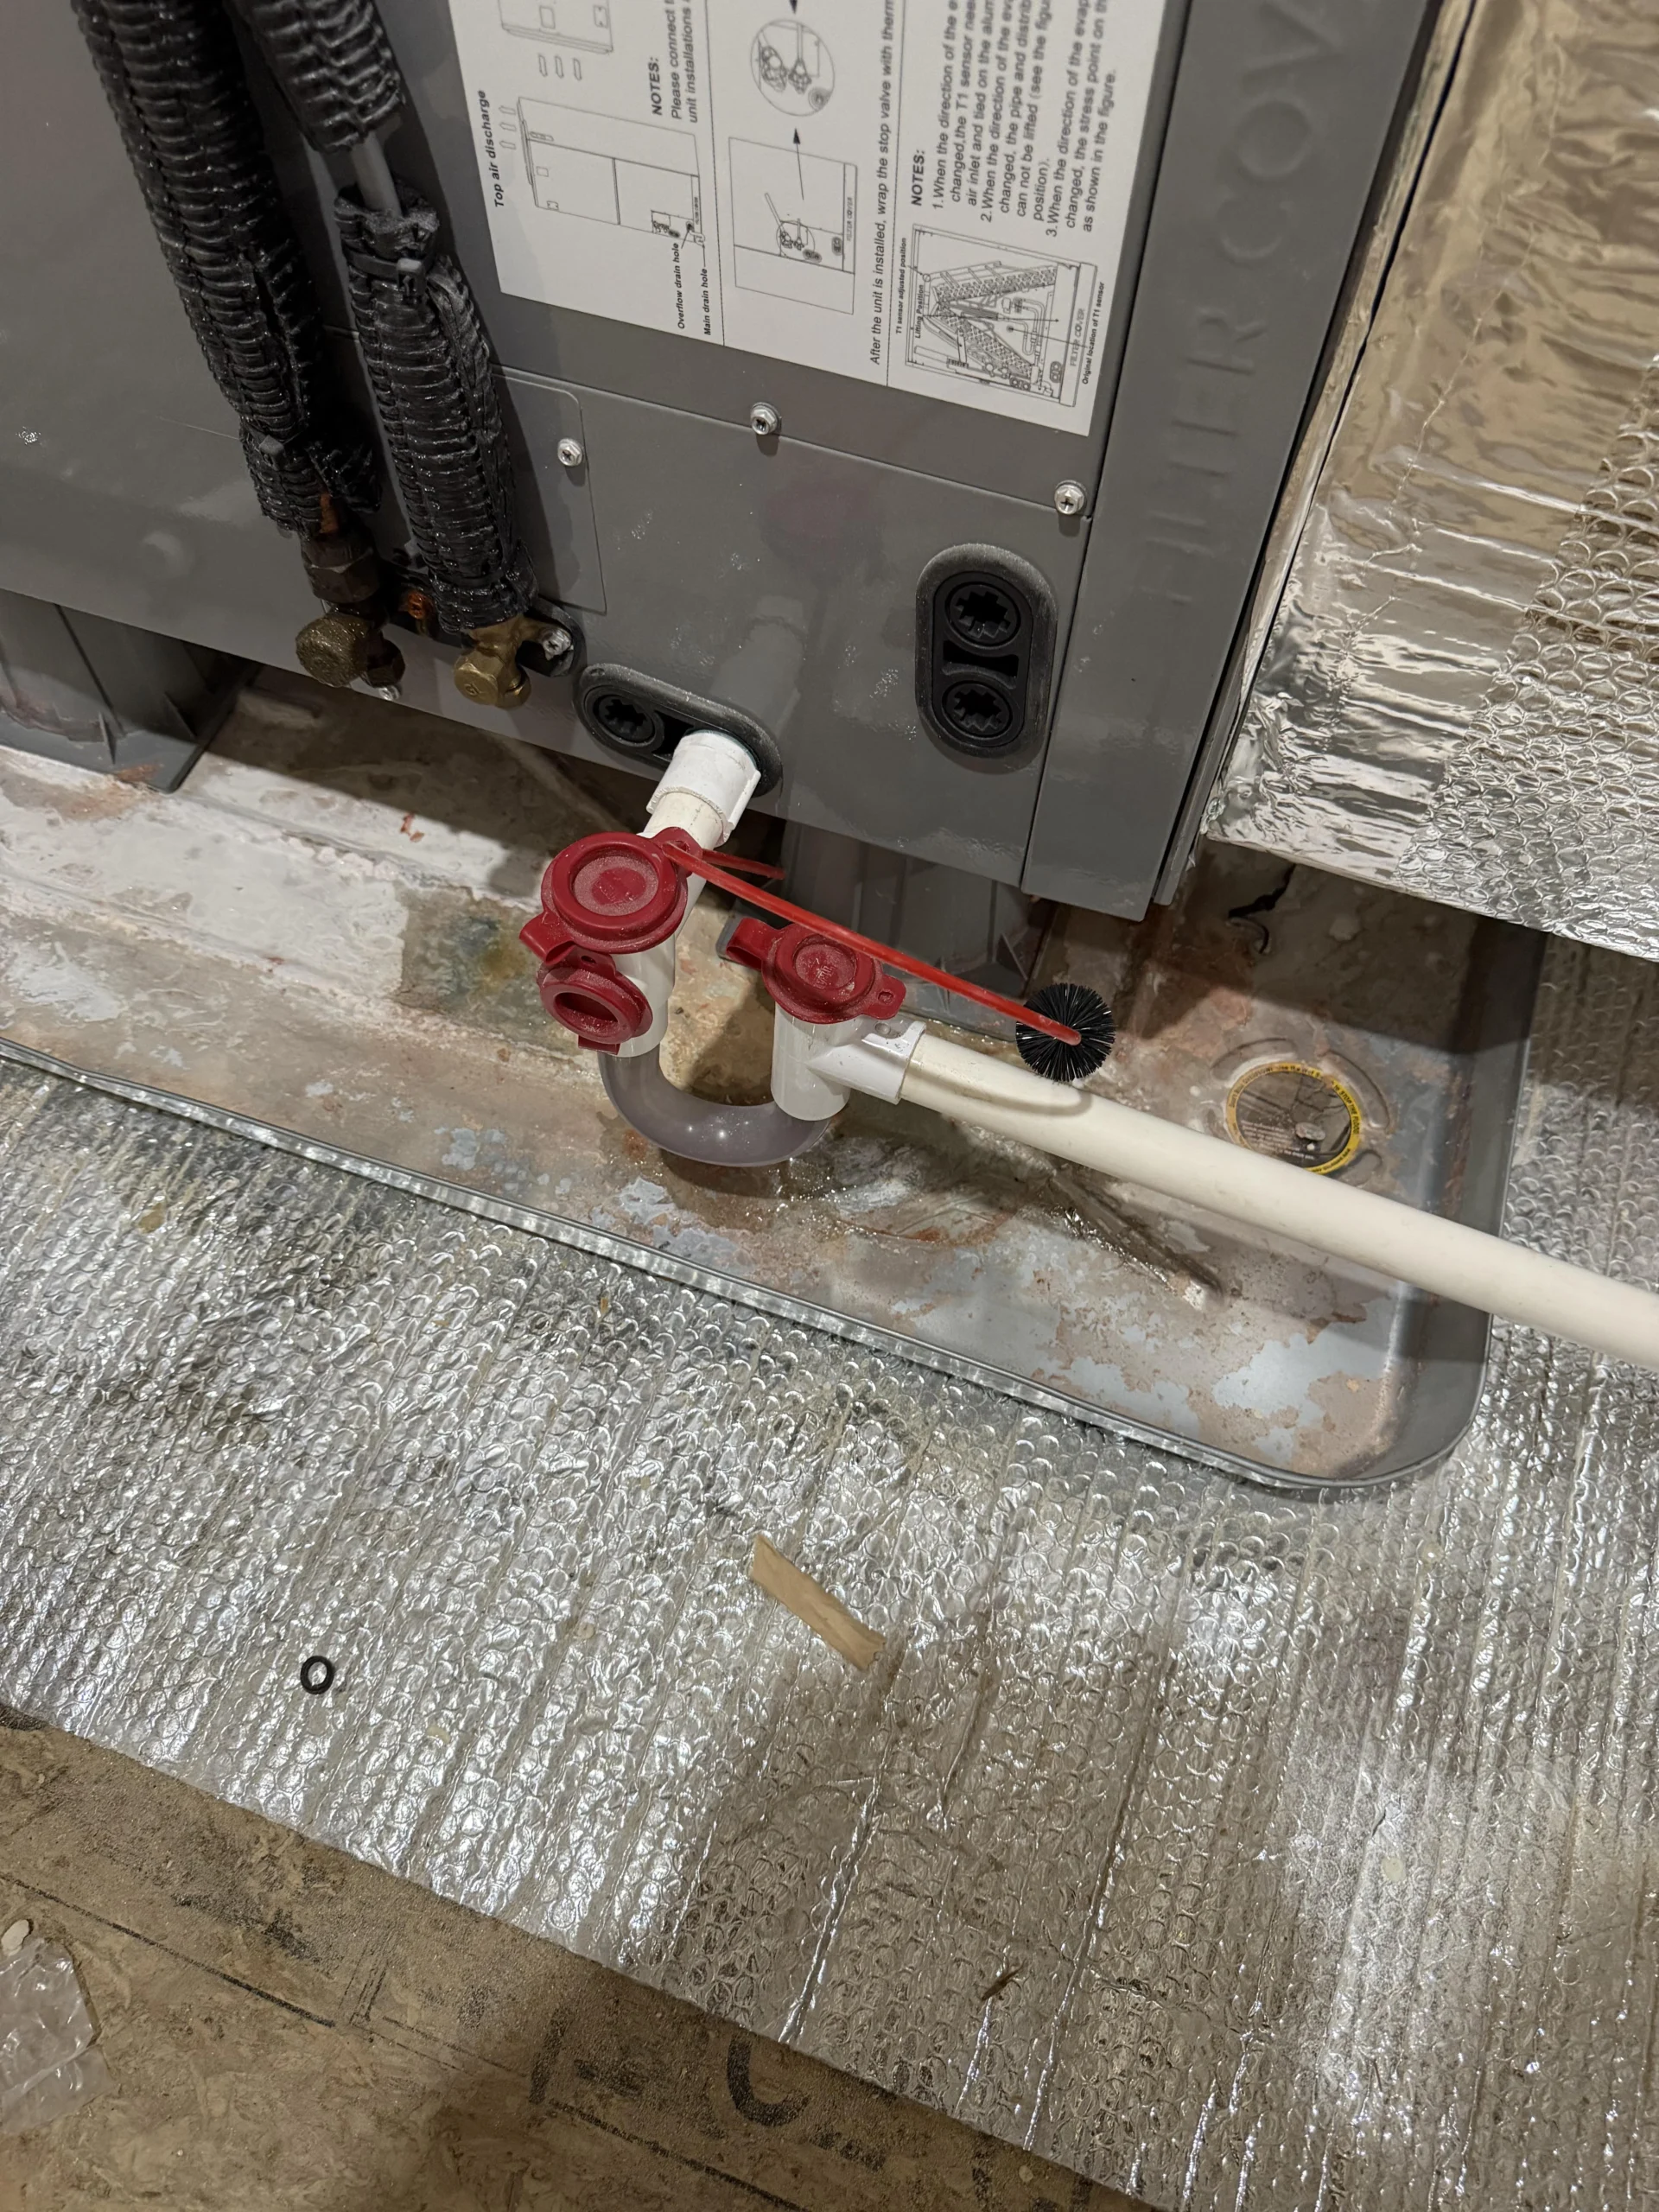
A partial restriction, poor drainage, trap issue, or other problem could cause water to use a secondary route. The indoor photograph alone does not establish whether that is happening.
The Discharge Location May Keep the Roof Too Wet
Even when the HVAC system is operating normally, repeatedly discharging water onto the same small roof area may keep the surface damp, encourage discoloration, and make it harder for the roof to dry between cooling cycles.
Roof Geometry May Be Holding the Water
The lower roof configuration, nearby walls, shade, limited airflow, debris, or a shallow drainage path could allow water to remain longer than expected. These conditions require an on-site view.
Should the Pipe Be Extended to the Gutter?
Extending or redirecting the line may ultimately be part of the solution, but it should not be the homeowner’s first action. The appropriate termination depends on the identity of the drain, the roof and gutter layout, the manufacturer’s installation requirements, and any applicable local requirements.
A loosely placed extension running across shingles could move water to a different location while creating new concerns. It could shift, trap debris, interfere with drainage, remain visible, or conceal evidence that an auxiliary drain is operating.
Before approving a pipe extension, ask for confirmation that:
- The contractor has identified the drain line.
- The primary condensate path has been checked.
- The proposed route will not retain water against the building.
- The pipe will be secured and supported appropriately.
- The discharge will not simply create a new wet area.
- The roof, siding, and gutter details have been considered together.
What Not to Assume
Photographs cannot distinguish mold from algae, dirt, staining, or another type of surface growth.
Condensate production can accompany normal cooling. The line’s identity and drainage path must be evaluated.
New construction reduces the likelihood of age-related wear, but it does not confirm that every drainage detail is performing as intended.
Surface cleaning alone will not address repeated wetting if the pipe continues discharging onto the same area.
Do Not Try These Approaches
- Do not climb onto the roof to inspect or redirect the pipe.
- Do not walk on wet or discolored shingles.
- Do not attach an unsecured hose or pipe across the roof.
- Do not pour drain chemicals into HVAC condensate piping.
- Do not open electrical panels or remove HVAC equipment covers.
- Do not pressure-wash the roof or scrub shingles aggressively.
- Do not apply bleach, biocide, or roof-cleaning products without confirming that the method is appropriate for the roofing material.
Warning Signs That Deserve Faster Attention
- Water is collecting inside or beneath the HVAC equipment.
- A drain pan is holding water or appears to be overflowing.
- Ceiling stains or damp drywall appear below the equipment.
- The roof surface feels soft, displaced, or damaged when assessed by a qualified professional.
- Water is entering behind siding, trim, flashing, or the roof edge.
- The discharge becomes a heavy or continuous stream unexpectedly.
- Musty odors or visible interior growth appear.
- The cooling system shuts off repeatedly or shows signs of drainage trouble.
Who Should Evaluate It?
Builder or Warranty Department
Because the home was recently constructed, begin by documenting the condition and asking the builder to review the HVAC drain termination and affected roof area.
Licensed HVAC Contractor
The HVAC contractor can trace the drains, identify the exterior pipe, check the primary drainage path, and recommend an appropriate discharge arrangement.
Qualified Roofing Professional
A roofer can evaluate the shingles, drainage path, wall and roof intersections, flashing, and any signs that repeated wetting has affected the roof assembly.
Exterior or Gutter Professional
This may be relevant if the proposed correction involves routing water toward a gutter, modifying an exterior termination, or protecting nearby siding and trim.
Questions to Ask the Builder or Contractor
- Which condensate line exits through this soffit?
- Is it the normal drain or a backup drain?
- Where does the primary condensate line discharge?
- Has the primary drain been checked for a restriction?
- Was this roof discharge location part of the intended installation?
- Should this line be redirected, extended, or terminated elsewhere?
- Will the proposed correction keep water off the roof and siding?
- Has the affected roof surface been checked for damage?
- How should the surface discoloration be cleaned without damaging the roof?
- Will the completed correction be documented in writing?
How to Document the Condition
-
Save dated photographs
Photograph the pipe, the full wet path, the surrounding siding, and the indoor HVAC drain arrangement.
-
Record system operation
Note whether the air conditioner was running and approximately how long the pipe continued dripping.
-
Track changes over time
Record whether the dark area expands, dries, returns after cleaning, or begins affecting adjacent materials.
-
Submit the concern in writing
Send the photographs and observations to the builder or contractor and retain the response and proposed correction.
Have the Drain Identified Before Redirecting It
The visible discoloration suggests that this section of roof is being wetted repeatedly, so the condition is worth addressing rather than ignoring. However, the photographs do not prove mold, roof damage, or an improper installation.
Contact the builder and HVAC contractor, provide the photographs, and ask them to identify the line, verify the primary drain, and evaluate the discharge location. A roofing professional should assess the affected surface if there is concern about prolonged wetting or deterioration.
Do not install a temporary extension across the roof until the line’s purpose and the correct permanent drainage route have been confirmed.
Tell Us What You Are Seeing
Submit your question, observations, and optional photographs. We may turn the submission into an educational homeowner resource while protecting your personal information.